Now that I’ve completed the basic systems for my robot, I’m working on a user interface that will be intuitive and provide plenty of visual feedback. The ‘bot will be driven with a PS3-style controller, as I’m most comfortable and familiar with those layouts, and I’m thinking of designing a UI that bears similarity to popular driving video games (like GTA3). I figure that a lot of very smart people have spent years and millions of dollars designing systems and UIs that are simple enough for a 7 year old to master, yet robust enough for training military personnel. So why reinvent the wheel when the best practices already exist?
That said, I’m leaning towards an interface that is simply a camera feed overlaid with data and images. My interface is currently Python-based with the wxWidgets and OpenCV Python wrappers, so I need a way to do this with these frameworks. Turns out it’s actually not too bad.
After some googling around, I came across this article. It’s written in C++, with which I have a passing familiarity, and it assumes a deeper understanding of the inner workings of OpenCV than the casual hobbyist (like myself) typically possesses. Still, I was able to parse his code and convert it to Python for use in my UI’s framework.
I won’t reproduce his entire code, just the function that matters:
# OverlayImage function reproduced from: http://www.aishack.in/2010/07/transparent-image-overlays-in-opencv/

void OverlayImage(IplImage* src, IplImage* overlay, CvPoint location, CvScalar S, CvScalar D) {

    for(int x=0;xwidth;x++)
    {
        if(x+location.x >= src->width) continue;
        for(int y=0;yheight;y++)
        {
            if(y+location.y>=src->height) continue;

            CvScalar source = cvGet2D(src, y+location.y, x+location.x);
            CvScalar over = cvGet2D(overlay, y, x);
            CvScalar merged;
            for(int i=0;i<4;i++)
                merged.val[i] = (S.val[i]*source.val[i]+D.val[i]*over.val[i])
            cvSet2D(src, y+location.y, x+location.x, merged);
        }
    }
}
Basically, his function takes two images (src and overlay), a point (x, y) on the source image where the overlay will be drawn, then two scalar variables that will be used for blending the images. Then he simply iterates over each pixel in the source image, starting at the point where the overlay will be drawn, and blends it with the corresponding pixel of the overlay image using the blending coefficients S and D. The end result is that the source image is modified with the overlay image blended in at (x, y).
Here’s my first stab at converting his function into Python:
# Adapted from http://www.aishack.in/2010/07/transparent-image-overlays-in-opencv/
from cv2 import *

src     = cv.LoadImage("image.jpg")		# Load a source image
overlay = cv.LoadImage("ghost.png")		# Load an image to overlay
posx = 170					# Define a point (posx, posy) on the source
posy = 100					# image where the overlay will be placed
S = (0.5, 0.5, 0.5, 0.5)			# Define blending coefficients S and D
D = (0.5, 0.5, 0.5, 0.5)

def OverlayImage(src, overlay, posx, posy, S, D):

	for x in range(overlay.width):

		if x+posx < src.width:

			for y in range(overlay.height):

				if y+posy < src.width:

					source = cv.Get2D(src, y+posy, x+posx)
					over   = cv.Get2D(overlay, y, x)
					merger = [0, 0, 0, 0]

					for i in range(3):
						merger[i] = (S[i]*source[i]+D[i]*over[i])

					merged = tuple(merger)

					cv.Set2D(src, y+posy, x+posx, merged)

OverlayImage(src, overlay, posx, posy, S, D)

cv.SaveImage('src.png', src) #Saves the image
print "Done"
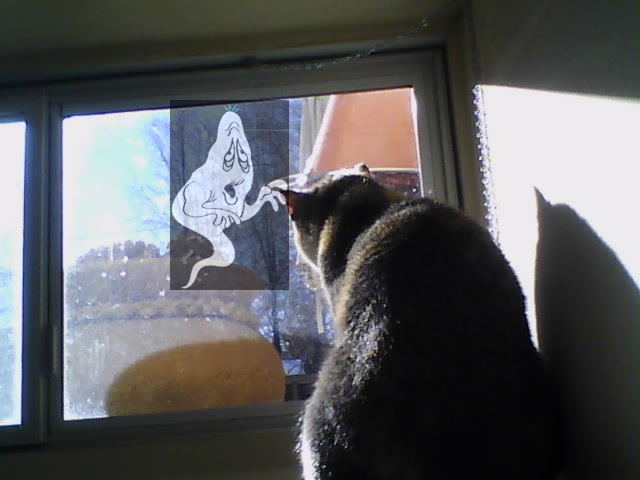
For my source image, I used a JPEG produced by the webcam near my basement window, and for my overlay, I found a cheesy image of a ghost that also happens to be a transparent PNG. When I ran these through the function using (x,y)=(170,100) and S=D=(0.5, 0.5, 0.5, 0.5), this was the result:

As you can see, the ghost is haunting my cat.
There is a fairly obvious flaw in this set up however. The ghost appears within a black box, which really ruins the effect. After some research, I learned that for whatever reason, OpenCV does not recognize transparencies in images. When it loads an image with an alpha (transparency) channel, it simply strips it and returns the RGB. Hence, the “transparent” pixels in the ghost image
Well, there IS a hack for making OpenCV recognize the transparency channel, but it involves modifying the source code and recompiling it. OpenCV was made by smarter people than myself, so I’m just going to assume their choice was intentional and not an oversight, and so I’ll stay safe by leaving the source code as-is. Also, I was feeling a bit lazy.
Besides, I figured out an easier software tweak that achieved the same result without needing hours of time to recompile and debug OpenCV itself. It’s not particularly clean and I’m sure a lot of developers would be apoplectic at seeing this, but it works anyway. Here’s how:
It’s clear from the above image that the transparent pixels in the ghost image will be converted from a RGBA (red-green-blue-alpha) value of (0,0,0,0) to (0,0,0) when OpenCV loads it and strips out the alpha. This is why the area around the ghost appears to be black (RGB is 0,0,0). Knowing this, I can avoid the black box artifact by using a conditional statement which basically says: “if you reach a pixel in the overlay that is totally black, ignore it.”
The downside to this is that it will work great for some images and horribly for others. It’s fine for the scope and application of my particular needs here, but in general it’s bad practice (hopefully that calms any angry devs)
Here’s my revised code:
# Adapted from http://www.aishack.in/2010/07/transparent-image-overlays-in-opencv/
# Note: This code assumes a PNG with a Color->Transparency, with black as the alpha color

from cv2 import *

src     = cv.LoadImage("image.jpg")		# Load a source image
overlay = cv.LoadImage("ghost.png")		# Load an image to overlay
posx = 170					# Define a point (posx, posy) on the source
posy = 100					# image where the overlay will be placed
S = (0.5, 0.5, 0.5, 0.5)			# Define blending coefficients S and D
D = (0.5, 0.5, 0.5, 0.5)

def OverlayImage(src, overlay, posx, posy, S, D):

	for x in range(overlay.width):

		if x+posx < src.width:

			for y in range(overlay.height):

				if y+posy < src.width:

					source = cv.Get2D(src, y+posy, x+posx)
					over   = cv.Get2D(overlay, y, x)
					merger = [0, 0, 0, 0]

					for i in range(3):
						if over[i] == 0:
							merger[i] = source[i]
						else:
							merger[i] = (S[i]*source[i]+D[i]*over[i])

					merged = tuple(merger)

					cv.Set2D(src, y+posy, x+posx, merged)

OverlayImage(src, overlay, posx, posy, S, D)

cv.SaveImage('src.png', src) #Saves the image
print "Done"
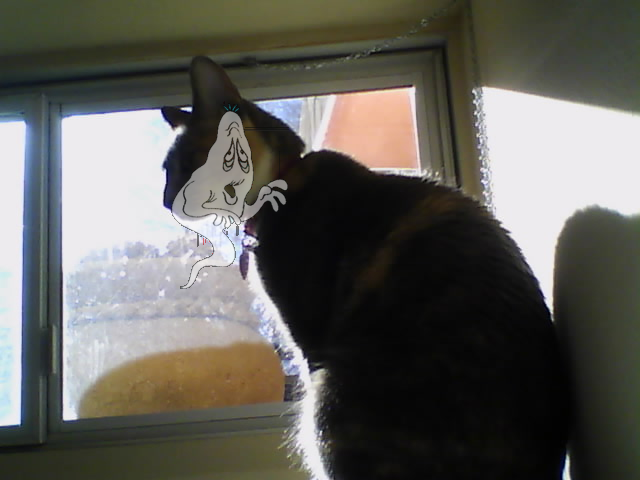
…and the result:

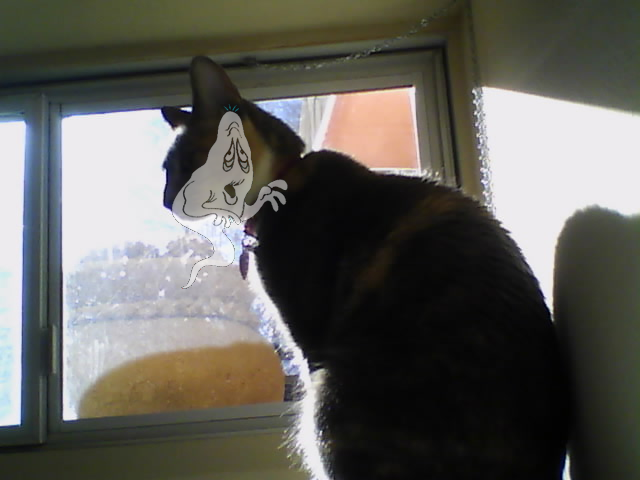
Much better, but there are still some artifacts in the image, notably around his tail and his forehead. Not too big a deal, I’ll just change the line that says “if over[i] == 0:” to “if over[i] < 40:” and check the result:

Nice!
The only thing left now is to test this overlay algorithm on a live video feed. After all, that’s what my current UI concept requires. I took the above scripts and incorporated them into a simple wxPython/OpenCV framework. Basically, the program does this:
- Define variables, including a starting position for the ghost
- wxPython creates a window
- OpenCV captures an image from the webcam
- Update the ghost's position
- OverlayImage function combines the ghost with the captured image
- wxPython draws the result to the window
- Repeat steps 3-6 indefinitely
Here’s the code:
# Adapted from http://www.aishack.in/2010/07/transparent-image-overlays-in-opencv/
import wx
from cv2 import *

capture = cv.CaptureFromCAM(0)
overlay = cv.LoadImage("ghost.png")
posx = 0
posy = 0

xdir = 1
ydir = 1

xspeed = 1
yspeed = 1

S = (0.5, 0.5, 0.5, 0.5)
D = (0.5, 0.5, 0.5, 0.5)

class MyFrame(wx.Frame):
	def __init__(self, parent, id, title):
		wx.Frame.__init__(self, parent, id, title, size = (640, 480))
		self.SetBackgroundStyle(wx.BG_STYLE_CUSTOM)
		self.Bind(wx.EVT_PAINT, self.on_paint)
		self.update()

	def update(self):
		self.Refresh()
		self.Update()
		wx.CallLater(1, self.update)

	def on_paint(self, event):
		src = cv.QueryFrame(capture)
		if src:
			overlaid = self.OverlayImage(src, overlay, S, D)
			self.bitmap = wx.Bitmap('src.png')
			dc = wx.PaintDC(self)
			dc.DrawBitmap(self.bitmap, 0, 0)

	def OverlayImage(self, src, overlay, S, D):

		global posx, posy, xdir, ydir

		if posx+overlay.width+xdir*xspeed >= src.width:
			xdir = -1*xspeed
			posx = src.width - overlay.width
		elif posx < 0:
			xdir = 1*xspeed
			posx = 0
		else:
			posx = posx+xdir*xspeed

		if posy+overlay.height+ydir*yspeed >= src.height:
			ydir = -1*yspeed
			posy = src.height - overlay.height
		elif posy < 0:
			ydir = 1*yspeed
			posy = 0
		else:
			posy=posy+ydir*yspeed

		for x in range(overlay.width):

			if x+posx < src.width:

				for y in range(overlay.height):

					if y+posy < src.width:

						source = cv.Get2D(src, y+posy, x+posx)
						over   = cv.Get2D(overlay, y, x)
						merger = [0, 0, 0, 0]

						for i in range(3):
							if over[i] < 40:
								merger[i] = source[i]
							else:
								merger[i] = (S[i]*source[i]+D[i]*over[i])

						merged = tuple(merger)

						cv.Set2D(src, y+posy, x+posx, merged)
		cv.SaveImage('src.png', src) #Saves the image


class MyApp(wx.App):
    def OnInit(self):
        frame = MyFrame(None, -1, 'Spooky!')
        frame.Show(True)
        self.SetTopWindow(frame)
        return True

app = MyApp(0)
app.MainLoop()
In testing I found that if I commented out the OverlayImage function, I could get about 20-25fps, which is pretty decent. But once I enabled the OverlayImage function, my framerate dropped to about 2 fps. It could be due to the fact that OverlayImage is saving a file to the disk, then right after the same file is being reopened and loaded into the wxFrame; holding the result in memory would probably be faster. I’m not sure that it would cause a performance drop of 900%, but who knows.
I’m thinking the main culprit here is Python. While I find it much easier and more intuitive that C++, it’s still an interpreted language and will never be as fast or as efficient. I’m now wondering, based on this little experiment, whether I should A) change the UI concept to something less CPU-intensive for Python’s sake, or B) change my code into C++/wxWidgets/OpenCV. I’ll have to tinker around and see if I come up with any other ideas.

